Tools for Assembling RTA Cabinets: RTA Cabinets are very famous among homeowners who are attempting to renovate on a budget with a professional look. From contemporary Austin kitchens to traditional Dallas bathrooms, more and more Texans are deciding to handle assembling their cabinet purchase on their own. But while manufacturers offer instructions and hardware, the secret to a successful project is having the right tools close at hand.
This blog explores the best tools for assembling RTA cabinets, by yourself at home, ideas for speeding up your project, and what to do if you realize you’d rather leave it to the professionals.
What Are RTA Cabinets
RTA stands for “ready to assemble,” and RTA cabinets are the best option for those who are looking for new cabinetry right now at an affordable price. Each cabinet is delivered flat-packed and separated by pre-cut panels, hardware, hinges, and assembly instructions. This convenient square size allows you to save on shipping and labour costs for an easy and affordable way to update your kitchen, bathroom, or laundry, even if you’re on a shoestring budget.
Key Benefits of RTA Cabinets
RTA cabinets are versatile in their colour, shape, size, and use. Whether you love the clean lines of a modern look or want something more traditional with rich wood grains, there is a vanity to match your style. And because you do the assembling yourself, you have more control over the final look and quality of your installation.
But as easy as these kits are, they can lead you down the wrong path if you think you can cheat on preparation. Patience, a clean workspace, and a good set of tools are prerequisites for a job well done.
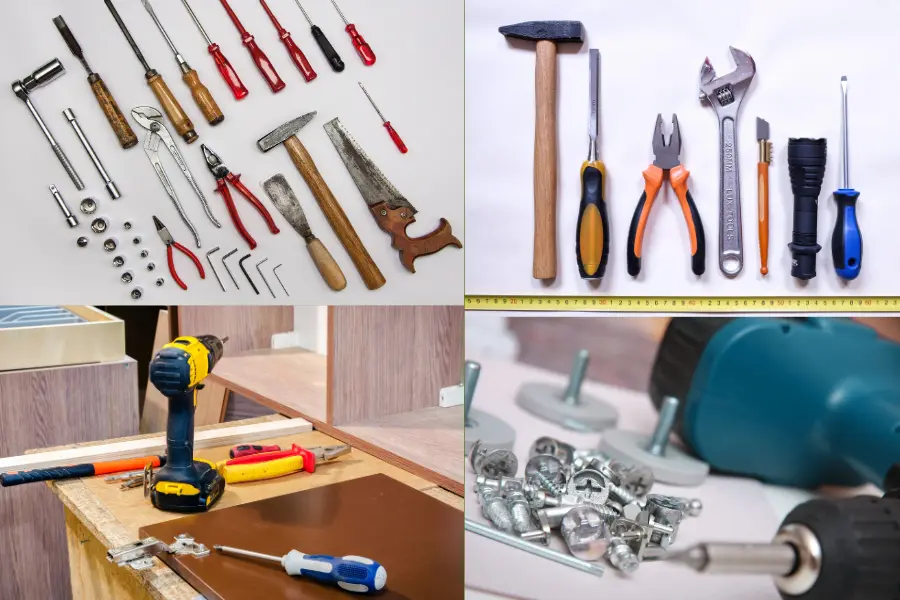
Essential Tools for Assembling RTA Cabinets
Before you even reach for that first box, make sure you have the basics. It allows you to prevent frustration, and to be certain every cabinet lines up straight, all doors function as decorated, and that everything feels as if it will hold up forever.
Cordless Drill/Driver
You will need it to drive screws into panels, to pre-drill holes as needed, and sometimes even to back out or re-seat fasteners as you move through the instructions.
Find a drill with torque settings that can be adjusted up and down so you can manage the driving force. This is especially key as over-tightening can strip the holes in MDF or particleboard panels. This is prevented in one approach using a drill with a clutch that allows the motor to freewheel upon achieving a predetermined torque. It’s smart to have at least one fully charged extra battery nearby, so you don’t have to halt assembly for a recharge in the middle.
Rubber Mallet
Your drill does the heavy fastening, while your rubber mallet will help you coax panels and dowels together without marring the finish. A regular hammer can be marred or chipped, whereas a mallet has a surface large enough and soft enough to distribute force evenly across (it does not damage the cabinet surfaces).
Be careful with that, and if something doesn’t go in easily, make sure your parts are lined up and secure. And if the force is excessive, that is likely a signal that you’ve skipped a step or reversed some panel.
Clamps (Bar or Corner Clamps)
Cabinet panels are also seldom cooperative when you’re working by yourself. Especially bar clamps or corner clamps are extremely useful for stabilizing panels and keeping them square while you work on them.
Bar clamps will reach across the face of wider cabinets to maintain that even pressure while you drive screws or lock in fasteners. Corner clamps are even more niche; they secure edges at a crisp 90-degree angle, leading to clean, professional-looking seams.
Level
There’s nothing that disrupts a lovely cabinet installation more than surfaces that aren’t level or flat. Second, you can make sure that every cabinet is perfectly straight by using a good level before you fasten it in place.
A level can be useful in making sure the sides and front edges are square when you assemble things. It’s key for ensuring that your cabinets are properly positioned relative to walls and adjacent fixtures during installation.
Screwdriver Set
A cordless drill will cover most fastening duties, but there are many occasions you’ll be glad to have a manual screwdriver. More delicate hardware, much like all that fine-tuning or those decorative drawer handles, can often benefit from lighter contact.
This means it accommodates not only Phillips and flathead drivers but also, depending on the hardware on your cabinets, Torx drivers, providing much-needed flexibility and precision.
Measuring Tape & Pencil
Even if you’ve had your cabinet pieces precut, you’re going to need the measuring tape and pencil as you assemble and install. Few would rather that a measuring error never becomes apparent when it comes time to install fasteners or set a cabinet at the right height.
That is particularly important when you are hanging wall cabinets or you’re lining up multiple units side by side. Make sure you measure twice, then drill it. Note on well your reference points, so you feel confident as you go.
Wood Glue or Cabinet Adhesive
Lots of other rta cabinet instructions will tell you to use wood glue or construction adhesive in addition to screws or cam locks. This additional bonding process provides the connecting joints with much more strength.
The use of glue, make sure to use a very thin and even glue line to prevent squeeze out. If any glue does happen to squeeze out, it can be easily removed with a wet cloth before it becomes too rigid. Time: Allow it to cure for the recommended time before putting any stress on the joints. This is something that can make doors lose their fit, particularly in high-use areas like kitchens, if skipped.
Allen Wrench / Hex Key Set
Most RTA kitchen cabinets come with either Allen head bolts, cam locks, or a combination of the two securing them together that need a hex key to assemble. Although a single Allen key comes in the box, a full set will help the assembly process go faster and smoother, especially if you are working in tight spaces.
Stud Finder (for Wall-Mounted Cabinets)
A stud finder is essential if you’re installing the upper cabinets. The fact is that only the sturdiest mount into wall studs can be trusted to keep cabinets in place while supporting the weight of dinner dishes and supplies.
Now, scan the wall slowly to find every stud, and clearly mark where they are so you can plan your mounting screws around their position. Never trust to drywall anchors alone for cabinets that will bear substantial loads.
Safety Gear (Gloves, Goggles)
Safety is as important as accuracy. It’s a good idea to keep work gloves on at all times to protect hands from splinters and jagged edges. Goggles help protect the eyes from debris while drilling or tapping panels.
And think about getting knee pads if you are going to be putting cabinets together on the floor, your knees will be grateful after stooping for a few hours.
Assembly Tips for Texa’s DIY RTA Cabinet Projects
There are a few regional considerations that homes here in Texas (advancing into the heat of summer and differing climates) have to take into account when putting together RTA cabinets. Here are a few pro tips for making your cabinets look good and last ages:
Work Indoors in a Temperature-Controlled Environment: Wood can expand or warp when exposed to excessive heat or humidity.
Lay Out All Parts Before You Start: Check and double-check the numbered inventory list to ensure that you have all the parts you need.
Label Panels and Hardware: When you receive parts or disassemble something, label them with painter’s tape to avoid mixing them up.
Read Instructions Closely: Even if you’ve set up tow bars before, each brand has its own set of fasteners and mounting sequence.
Don’t Rush: Don’t rush to align everything carefully. Rushing results in uneven doors with a gap.
Get a little help: Large cabinets are unwieldy and heavy. Lifting and holding panels is far safer with a second person.
Conclusion
Tools for Assembling RTA Cabinets: The decision to go with RTA cabinets is one of the best ways to give your kitchen, bathroom, or laundry room extra appeal on a budget. Arm yourself with the proper tools: a cordless drill, clamps, a trusty level, and the appropriate protective wear, and you prepare for a frustration-free project. By paying attention to a few details and doing some careful planning, you can also get the same shiny, professional results outside the salon.
If you are planning to make your dream cabinets, then contact us at Custom Cabinetry TX. We specialize in creating and installing top-quality custom cabinets that are custom-built to the exact measurements of your room and meet your style.